Build an Object Recognition App with vue3 and Tensorflow


Machine learning is one of the trendy topics in computing right now. We will explore it using the TensorFlow package and the latest version of Vue for our client.
This tutorial will teach you how to create object detection models and how models are trained in TensorFlow using vue3 as our client and tailwindcss for styling the application.
Overview
In this tutorial, we will be building a model that catches objects users place in front of the camera, and our image detection model reveals what object it is. For example, a smartphone or a watch, etc.
Prerequisites
To follow along in this tutorial, the reader should be comfortable using Vue.js and the new composition API
Goals
At the end of this tutorial, readers should know what machine learning is and how it relates to AI, set up models, and use the vue3 composition API and new hooks.
What Is Machine Learning
The world is filled with data (videos, pictures, music) and much more information out there. This data is not only generated by people but by millions of devices in the world. This data keeps increasing each day. Machine learning brings meaning to all of this data by getting computers to learn from this data, keep on learning, become autonomous, and make decisions/predictions based on data fed to the computers.
How Does Tensorflow Fit in? Machine Learning is an intricate field, and it can be challenging to work with. Thanks to frameworks like Tensorflow, building machine learning models is not as intimidating and challenging as it used to be, easing the process of acquiring data, training models, and solving predictions, and refining future results.
How Models are trained A machine learning model is a representation of reality. It is a file of data that has been trained to identify a particular type of pattern. To train a machine learning model, you provide it with an algorithm that it can reason over and learn from that data.
Let's dive into building our image detection app.
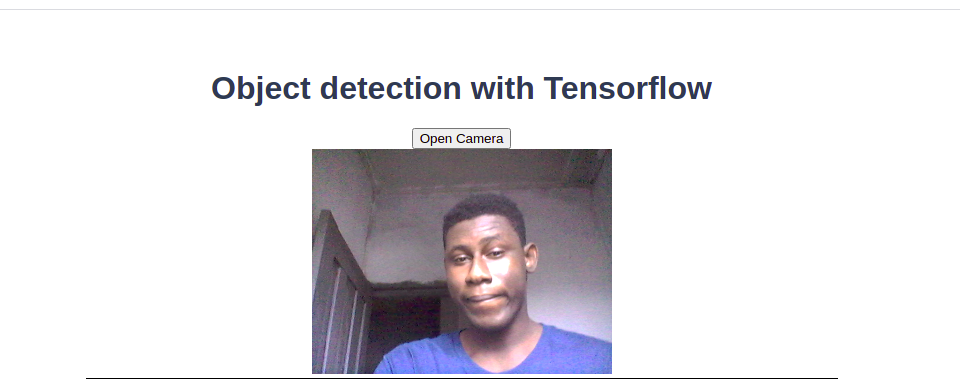
What Our Final App Looks Like
When we are done, our app will consist of a button that opens our device camera and another button that detects the object we position in front of the camera and take a snapshot of.
Note: As of now, the TensorFlow model can detect at most 90 objects. Keep this in mind when trying to detect random objects

Setting Up Vue and Tensorflow
You can start a new vue3 project using the vue cli but you have to install the cli first by running-
After the cli is installed, you can create a new project by running the following.
We are then going to be asked a series of questions about the new project at the prompt. We want to
- Manually select features for the project
- Select Typescript and leave the remaining checked features as is.
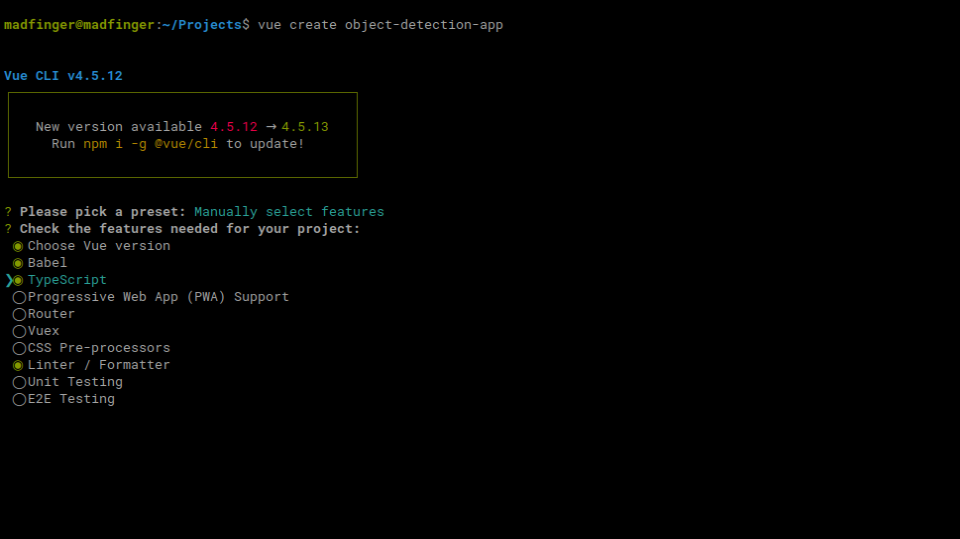
- Select version 3 of vue
- Use babel and select eslint with error prevention
- Select the lint on save option
- Choose a dedicated config file.
Install the packages we need from TensorFlow
For us to be able to use TensorFlow, we need to install the following packages.
-
@tensorflow-models/coco-ssd
-
@tensorflow/tfjs-converter
-
@tensorflow/tfjs-core
-
@tensorflow/tfjs-backend-cpu
-
@tensorflow/tfjs-backend-webgl
npm install @tensorflow-models/coco-ssd @tensorflow/tfjs-converter @tensorflow/tfjs-core @tensorflow/tfjs-backend-cpu @tensorflow/tfjs-backend-webgl
Setup of Tailwindcss
To set up Tailwind CSS, we run this install script.
Then use Tailwind CSS to create our configuration file.
In your main.js file, import tailwind
Now in our App.js let’s require @tensorflow/tfjs-backend-cpu, @tensorflow/tfjs-backend-webgl.
The @tensorflow/tfjs-backend-cpu package implements a JavaScript based CPU backend to TensorFlow.js, while the @tensorflow/tfjs-backend-webgl package implements a GPU accelerated WebGL backend for TensorFlow.js.
App workflow
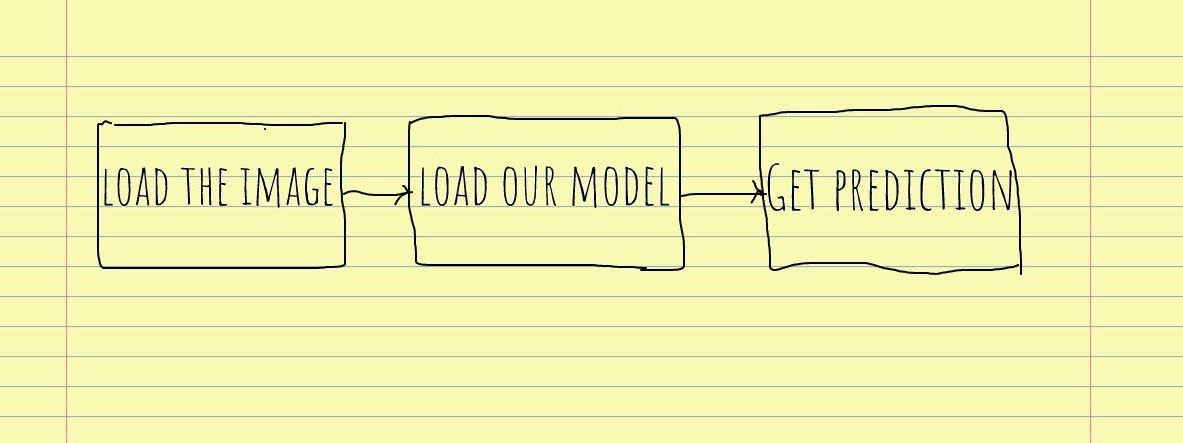
We want our app to fetch a random image off the internet to make sure our model is working. After that, we would tap into our device camera to take a snapshot of an object. After we do this, we load the object prediction and display it on the screen.
The majority of what we are going to be doing takes place in our App.js file.
Starting, our template would contain an image of scissors and a button that would detect what is in our image when clicked. We set the ref of the image to the imgRef we have created in our setup function and cross-origin to anonymous so we don't have any errors when we try to detect it.
Using the vue3 composition API, we import our ref from vue. Then in our setup function, we create an image ref, which is an empty string initially. We also set our result ref to store the results we get after the detection. An array is returned after our model loads, so we set the result to an empty array. We have our detect function for when we click on the detect button.
In our detect function, we set our imgRef value which is the scissors image URL, We load our model, and after we get the prediction of the image, we set our result array to the prediction and log our prediction.
The logged results when we click "detect" look like this.

We can see the prediction under the class of "scissors". Now that we have seen that our model is working, we want to be able to take a snapshot from our camera and pass it into our model for prediction.
Accessing the Device Camera
Here is the fun part, where we take a snapshot of any object from our camera, put it in place of the scissors image, and detect what object it is. In our template, we add a button just above our image that when clicked, is going to access our camera and open it. We also added a video tag where our video will appear and set the ref to videoRef and autoplay to true so our video displays.
Then in our script, we use typescript type assertion to set our videoRef as a HTMLVideoElement we define our videoref and then our openCamera function that uses the javascript navigator API in
the browser to open our camera.
Above, we can check if the device has a media device. If it does, we can access the video media by setting the video to true in our getUserMedia argument. We now have a video stream and we set our srcObject of videoRef equal to it.
Now, if we click on the open camera button, we can see that our camera turns on.
But we want the open camera button to disappear when we start streaming from the camera, so we can create a ref to hold the value of isStreaming, which will initially be false. Then in our OpenCamera function, you can set it to true once your camera is accessed. Then in our template, we can use the v-if directive to make the openCamera button disappear when isStreaming is true.
When the stream begins, there should be a button to stop streaming from the camera. We create a button below the open camera button and use the v-else directive on it, so if isStreaming becomes false, the stop streaming button appears.
Then to stop streaming, we have to create a stop streaming function in our script. The stop streaming function grabs the video stream using our videoRef, and we assign it to a variable stream. We then access the video tracks using the stream, and for each track, we perform a stop track method.
Take a Snapshot of the Object
To take a screenshot from our device camera, then run the TensorFlow object detection model to predict what object we screenshot. We will create a snapshot button in our template that runs the snapshot function.
In this function, we access the DOM directly and create a canvas using the createElement the dom provides us with. We use the getContext method on the canvas to create a 2d canvas, then we draw an image using the drawImage method and pass in the video we have and the width and height of the image as arguments. Once we have the image inside the canvas, we can set our image to be of type image/png and setAttribute method to set the data of the image. Now, when we click on "snapshot," we create a snapshot and replace the image of the scissors with the snapshot. You can now place an object in front of your camera and detect what object it is when you click on the detect button
We have now achieved the feature of taking a snapshot from the device camera and detecting what object it is
Note: You can also install another camera device on your laptop and use that instead of your default laptop camera by using the enumeratedDevices method on the media device. You can now select the other camera device of ID and use it instead.
Cleaning up the application
We want to set isStreaming to false in the stopStreaming function so that the stop streaming button disappears.
We also make use of Typescript type checks to enforce safe typing on the DOM elements. The TensorFlow model takes time to detect the object, so we can set a loader on our detect button to show a loading state before the object is detected.
So we create an isloading ref, set to false initially, then in our openCamera function, we set it to true. Now in our template, we set two spans, and if isloading, we display the loading… text.
Note: Make sure that all the reactive data and also functions are returned in the setup function in our return statement
Resources
Conclusion
In this tutorial, we learned how TensorFlow relates to AI, how to install and set up TensorFlow and how to build a model that catches objects using the TensorFlow model.
If you have any questions, you can always send me a message on Twitter and I will respond.