How to Quickly Build a Backend with Dark Lang


Introduction
As a front-end developer, there will be a time where we will need some type of backend when building our side projects. While we can often decide to code the backend ourselves, this might take more time than expected. If this happens for every side project we have, we will have our git repositories filled with projects that might have more or less the same type of boilerplate code. To avoid these issues and quickly build small-scaled backends to serve my web applications, I often resort to Dark.
In this blog post, I’ll explain what Dark is while also introducing you to its components and what you can do with it. I’ll also show you how to build a simple REST API to serve your frontend, demonstrate how Dark allows you to create a datastore, and finally wrap up this article by showing you how Dark integrates with Stripe using one of its packages.
What is Dark?
Dark is a language and framework for building a serverless backend to serve your web applications without having to worry about infrastructure and deployment work.
First steps
When creating our application in Dark, we are redirected to our canvas.
 Canvas
The canvas works as an integrated development environment (IDE), web server, and HTTP client. As an IDE, it allows you to write code and access functionalities you usually have on an IDE, like text editing, debugging, and code completion. As a web server, it allows you to receive HTTP requests. Finally, as an HTTP client, it allows you to compose and send HTTP requests.
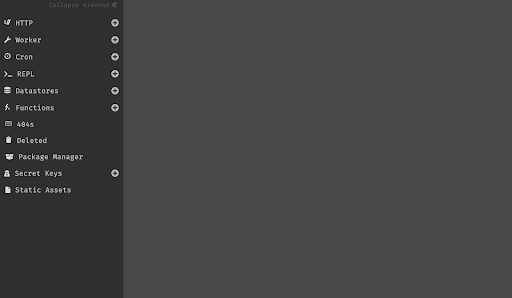
When interacting with your canvas, you can create handlers. Handlers represent the five components in Dark.
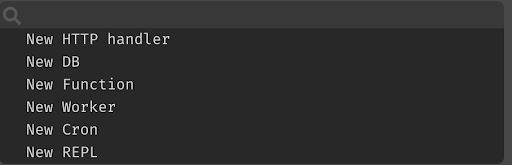 Omnibox
The five existent handlers are the following:
- REST API Endpoints
- Background Workers
- Cron jobs
- Persistent Datastore
- REPL
Code in Dark is written using these handlers. Handlers do not require an additional infrastructure or deployment process. They are available as soon as they are created and updated as code is written.
How to create a REST API?
REST API endpoints are one of the five handlers existent in Dark. This handler supports the standard REST methods: GET, POST, PATCH, DELETE, and PUT. To create a new HTTP handler, select it on the canvas sidebar or through the Omnibox.
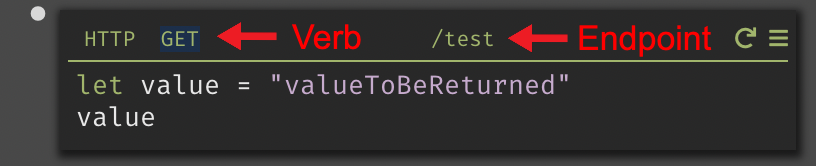 HTTP handler - GET request to /test
In the image above, we can see an HTTP handler that will be responsible for handling a GET request to the /test endpoint. In the code section of our handler, we declare a variable using the let keyword with value as the variable name. This variable is assigned “valueToBeReturn” as its value. Afterward, we leverage one of the functional aspects of Dark which is implicit returns.
Besides what we saw in the previous example, the REST API handler also supports features such as flagging and URL parameters.
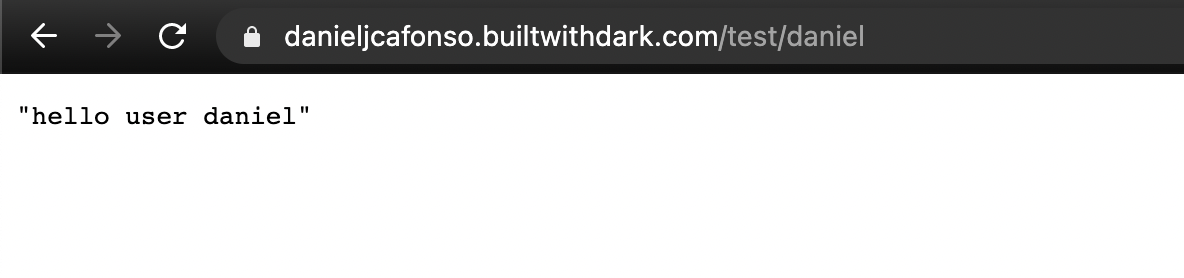
 HTTP handler - GET request to /test/:username with a feature flag
In the image above, we can see the following: a GET request to the test endpoint that receives username as the URL parameter. Then it returns “hello user” appended to the username. We then create a feature flag that when the username received is “admin” it returns “hello admin”. If we access our endpoint passing a value as username parameter, it will display the following:
 GET request to /test with a random user
If we pass admin as the username parameter, then the feature flag will jump in.
 GET request to /test with admin
Before ending this topic, it’s important to refer that Dark supports trace-driven development. Trace-driven development allows you to use real data to write your application. Here’s an example of it:
 GET request to non-existent endpoint hits the 404
Firstly try to access an endpoint that you haven’t configured in Dark yet. When you do so, Dark will add this endpoint to your 404s section.
 The GET request performed above is added to the 404 section.
Now, we can click on it to add it to our canvas.
When writing code, Dark will show you in real-time the incoming trace with data of what you are executing.
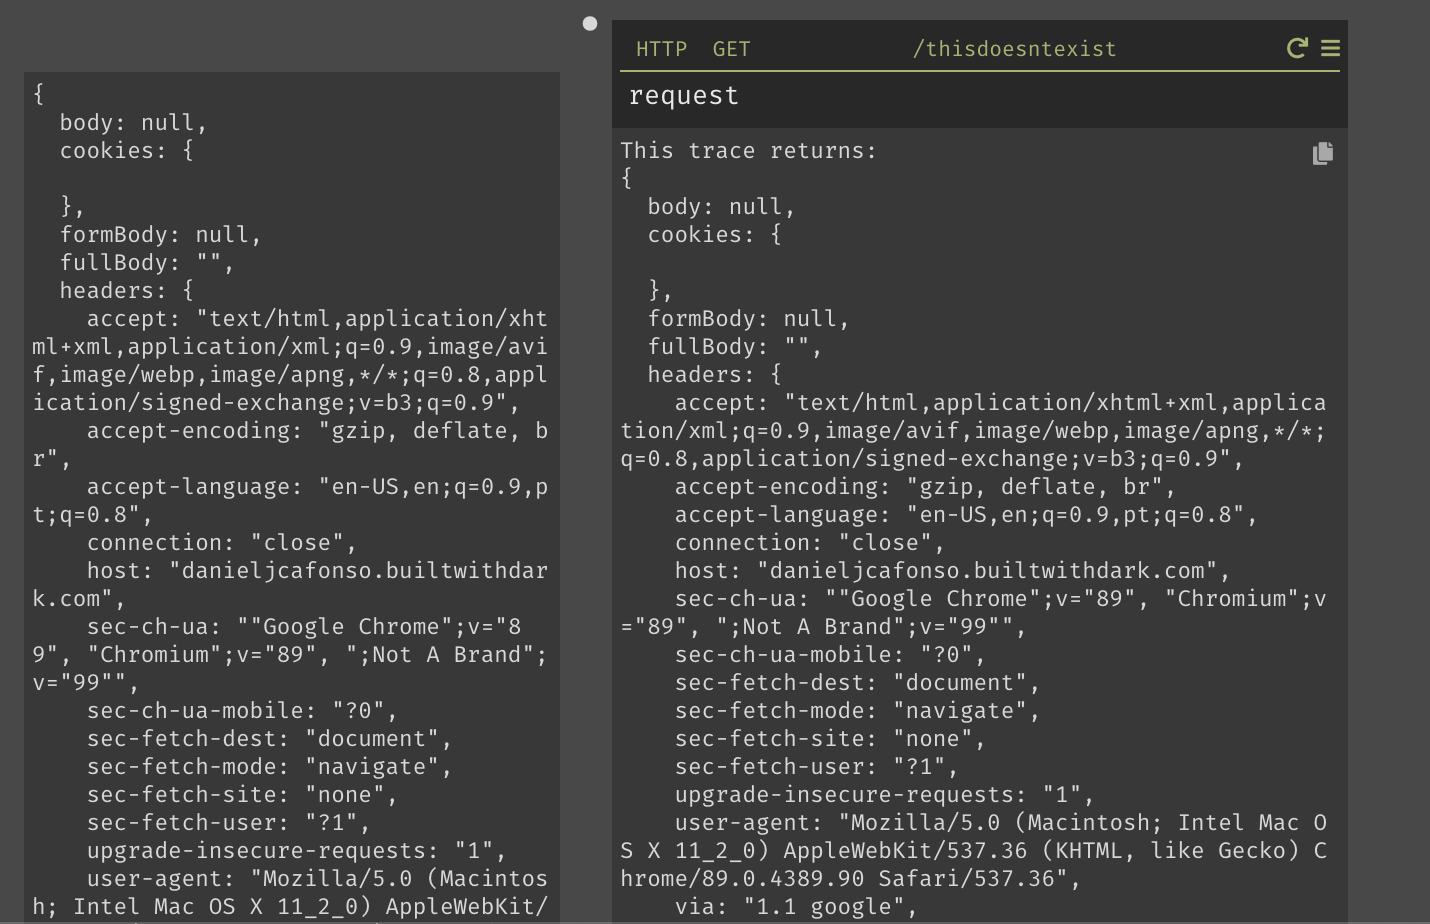 A trace of the output of the request
This is helpful because now, we can know the output of our request without changing tabs and running the request manually.
 A trace of the output of the accept headers from the request
Creating a Datastore
Datastores are one of the five handlers existent in Dark. Datastores in Dark are key-value-based. Here’s a datastore example:
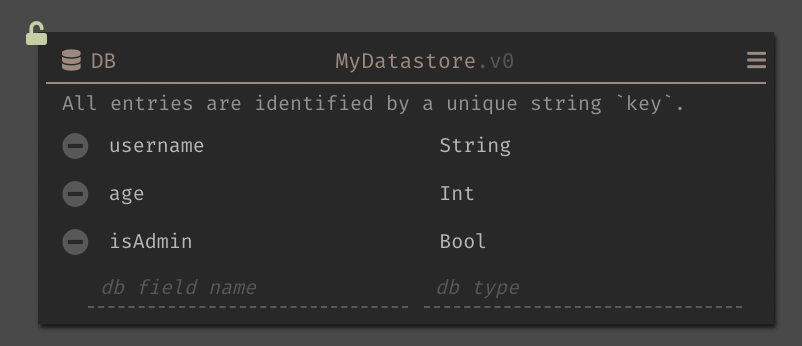 A datastore with three fields: username, age and, isAdmin
In the handlers shown above, we define the schema for our datastore record. It’s important to refer that in Dark, the key is a unique identifier of the string type that will serve each record. This key is not visible when looking at the datastore schema on our canvas. For the example above, here’s an example of how it would look stored:
Connecting to a REST API
Now we need to connect to our datastore. Usually, in our projects, we need to use some store of REST operation to interact with our datastore. In this section, I’ll show you how to add records to our datastore, followed by how to query our datastore for data.
Adding Records to the Datastore
Dark offers you a great set of functions to use in your handlers. You can access these functions by using DB::< nameOfTheFunction >
To add a new record to our datastore, we can use the DB::set function.
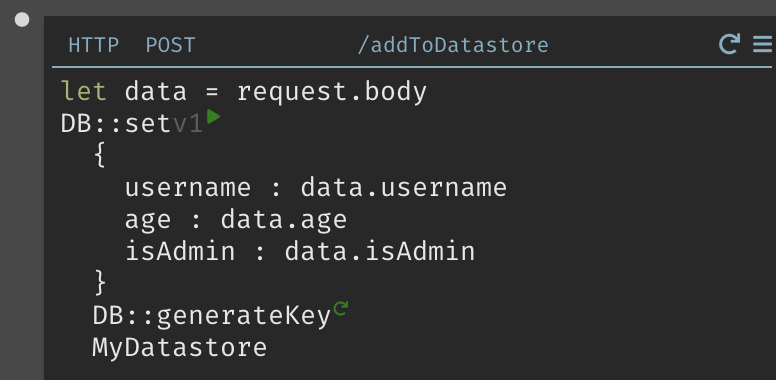 A handler for adding data to the datastore
On the handler above, we create an HTTP handler with a POST operation. In the code part of our handler, we access our data from our request body (this data will get sent as JSON). Then we use the DB::set function. This function receives three parameters:
- The expected fields for our record
- A key. Here we use the DB::generateKey function to create it.
- The Datastore name. From this point on, we can post a new JSON object in our request body to the /addToDatastore endpoint, which will cause a new record to get created.
Querying the Datastore
Besides offering functions for creating records, Dark also gives you functions for querying our datastore. Using the DB::getAll function and passing it the datastore name, we query the datastore for all of its records.
 A handler for getting all data from the datastore
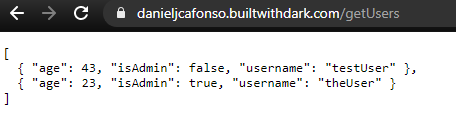 The output of the call to the handler above
Using the DB::query function and passing it the datastore name followed by an expression to get evaluated, we can write a specific query.
 A handler for querying the datastore for the records of a specific user
 The output of the call to the handler above
Integrating with Stripe API
At the moment, Dark supports a bunch of packages that contain functions related to that package. For example, the Slack package allows you to integrate with Slack and have access to conversations, schedule messages and build your own Slack bot.
During the Portfolio Project Club hosted by Egghead, one of the objectives was to integrate our app with Stripe. To my surprise, Dark already has a package to handle everything we might need to use from Stripe, which meant that I didn’t need to code a backend and could once again use Dark to make my life easier.
During this section, I’ll show how I used customer functions that belong to the Stripe package to query for customer information, followed by how I used Dark to create an endpoint that would be called as a webhook by Stripe every time a new subscription was created.
Getting customer data
During the development process of the portfolio project club, I needed to access all my existing customers to get relevant data, which was easily done by using the getAllCustomers function.
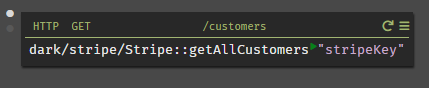 A handler for getting all customers on Stripe
Here I created an HTTP handler for a GET operation to the /customers endpoint. This handler calls the getAllCustomers function from the stripe package by passing it the Stripe key. Once the result of this call is done, it will return all the existing customers, as we can see from the following image.
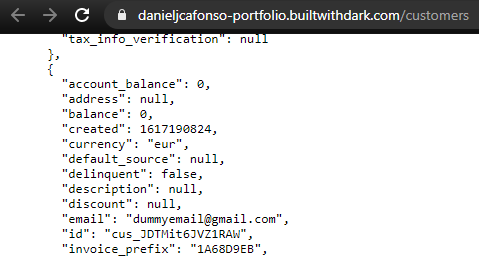 The result of getting all customers on Stripe
When logging in to my app, I needed to get only the information of a specific customer. To do this, I leveraged the getCustomer function.
 A handler for getting a specific customer on Stripe
Here, I created another HTTP handler for a GET operation to the /customer endpoint that receives a customerId as an URL parameter. Then I call the getCustomer function with the Stripe key and the customerId. Once the result of this call is done, it will return our customer data, as we can see from the following image.
 The result of getting a customer on Stripe
Creating a webhook
Tracking when a user subscribed to my products was one thing I needed during the development of the portfolio project club. If I wanted to get my customer subscription, I could just leverage the customer endpoint created above and check if it has subscriptions. The thing here is, I wanted to manage what subscription that user had myself, and I wanted Stripe to call me and say, “Hey, the user X just created a new subscription” and this was when I decided it was time to create a webhook. To create a webhook in Stripe, we have to access our dashboard, select developers, and then webhooks. Now on the webhooks page, we can add a webhook by selecting “Add endpoint”. Now Stripe will show you a modal where you can set your webhook. In the endpoint URL, we add the URL that we want Stripe to call when our event occurs. On the events to send, I wanted my endpoint to get called once a subscription got created, so I chose the “customer.subscription.created” event.
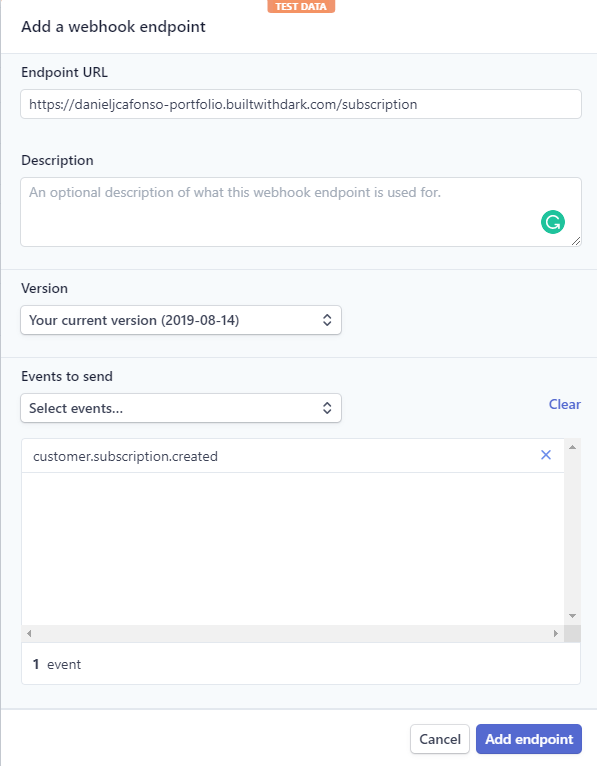 Adding a webhook on Stripe
Once this webhook is configured, Stripe will call our given endpoint every time a subscription gets created. Now we just need to link all this in Dark. The first thing that we need is our /subscription endpoint that Stripe will call once the event occurs, then we need some way to store the received data. To do this, we can leverage an HTTP handler for the first part and a Datastore handler for the second.
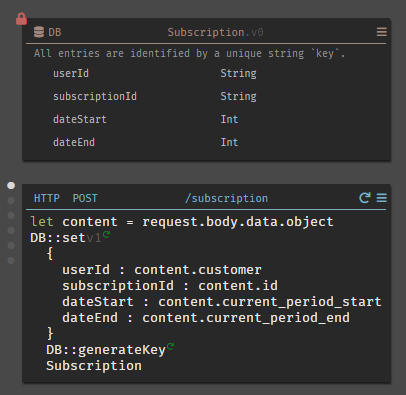 A datastore to save our subscription records and a handler to be called by the webhook when a subscribe event is triggered
As you can see from the image above, we created an HTTP handler that will receive a POST operation to the /subscription endpoint. When this POST occurs, it accesses that request body data and uses the DB::set function to add this new record to our created datastore. Using this now, I didn’t have to worry about checking for subscriptions by calling Stripe. I just let Stripe call me every time a new subscription was created.
Wrapping up
We saw how Dark could make your back-end building process much easier and time-efficient during this blog post. We saw how handling HTTP requests and storing records in data centers worked. And we ended with reviewing one of Dark’s packages for connecting with Stripe.
As you read in the introductory section, there’s more to Dark than just what’s written in this blog post, so I encourage you to try it out and start saving some time on building your backends.
I hope you enjoyed it, see you next time!