Building Offline-First Mobile Applications Using MongoDB Realm


Although everyone today might seem to be always connected and dependent on the internet, users of our applications have the desire to use their favorite apps at any time regardless of their device network connection status.
Within this article, using MongoDB Realm, we would add offline support to an existing React Native application that records a user’s audio and uploads it to an Amazon S3 bucket using a custom resolver function. Here’s a quick demo of the application before we modify it.
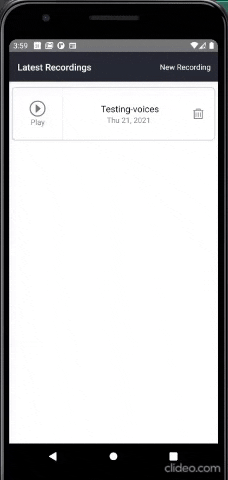
From the demo above, we can see everything works fine, — an audio recording is created and uploaded to the S3 bucket, then later fetched at the home screen as part of the user’s data in the MongoDB database. However, it’s missing the ability to save recordings when the internet is disconnected and sync when online.
Here’s an overview of what we would work across as we implement the offline support using MongoDB Realm.
Prerequisite:
You need to have React Native and an emulator configured on your computer to participate in adding the offline support to the application in this article. If you don’t, this part of the React Native Docs provides the guide you need on setting up your development environment. Also, you should have an idea of MongoDB Realm as this article focuses on how offline functionality can be achieved using MongoDB Realm.
Overview:
- Understanding the term “Offline First” and what it means to you.
- Understanding how MongoDB Realm fits into the stack of an offline-first application.
- Implementing "Offline First” support to a built application using MongoDB Realm.
- Learn how to use Realm for local data storage while providing offline support.
What are Offline First Applications?
If you’re not familiar with the term "Offline First”, it refers to applications designed to work without an internet connection. While these applications might make network requests when available, they can still operate when the internet is disconnected or flaky.
One key aspect of Offline First applications is the ability to perform Create, Retrieve, Update and Delete operations on data in the absence of an active internet connection. This is made possible through the use of a local database where the data is stored when offline then later synced with a remote database when online, if designed to.
An example of such a local database is Realm, designed originally for mobile devices with a simple object-oriented data model, Realm provides a robust fully local database available for both Native and hybrid cross-platform mobile applications. Since it’s acquisition in 2014 by MongoDB, Realm has expanded to provide edge cloud data synchronization of data stored in the local database to a remote MongoDB Database.
To see Realm in action, we can add “offline support” to an existing React Native application with an extra data synchronization feature using MongoDB Realm.
Application Setup
Using the commands below from your terminal, pull the existing application from its GitHub repository to your machine and install the dependencies;
Here are a few things to note about the cloned existing application;
- It was created as a bare React Native App with react-native-unimodules configured as Realm React Native SDK is not supported with Expo.
- Email and Password authentication is managed using MongoDB Realm.
- Audio recordings from the device are created using the expo-av package, then uploaded into an S3 bucket on AWS using a custom resolver.
- Data is fetched via a GraphQL API from MongoDB Realm’s Application Development Service.
Environment Variables
Create a credentials.js files with the following variables needed for the application to work;
The two variables values above are gotten from the Realm console when a new application is created. Have a look at this article if you just getting started with MongoDB Realm.
Note: The file above is ignored in the .gitignore file and won't be pushed to GitHub.
With the project fully set up locally, you can open the folder using your preferred editor or IDE as we would be making modifications across some major files in the codebase in a series of progressive steps.
Step 1: Switching Between Offline and Online State
One of Alex Feyerke’s recommendations on designing offline-first applications in this article, is to avoid displaying an error when an internet connection is lost. Rather you should gracefully handle the lack of connectivity by restricting the user from accessing views that require data or displaying subtle messages which inform the user of the lost internet connection.
We can apply this recommendation in our application by displaying a notification Flashbar informing the user of the connection status. First, we detect when the device has no active connection using react-native-offline, then notify the user by showing a flash bar using the react-native-flash-message.
Note: The *checkInternetConnection* method from the react-native-offline package detects an offline state by making HTTP requests to an endpoint then watches the response. If your app’s design is to only switch to an offline state when an operation is about to be made, then you can write your own custom helper for this.
Add the code below into the App.js file to display a message to the user when the app goes offline.
Above, we are checking the device connection status at an interval using JavaScript’s setInterval method. After the promise is resolved with a boolean result, we keep the value in the component’s state for later use.
At this point, we can get the device connection status. We would use the stored status value to display a flash bar notifying the user of their connection status.
Modify the same App.js file with the code below to do this;
Using the react-native-flash-message package above, we display a flashbar when the connection status is set to false, informing the user that the device has no internet connection, and recording would be saved locally.
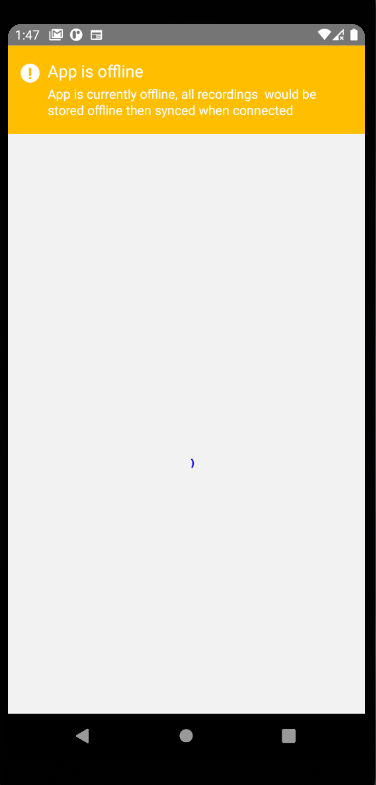
From the image above, we can see the Flashbar which shows a warning informing the user about the device’s lack of internet connection. Looking at the device screen, we can observe the application is still trying to load data even after the internet connection has been cut off.
We can further improve the app by displaying offline data when an internet connection is lost. To do this, we move forward to implement the offline-storage of data on devices using Realm.
Step 2: Offline Storage Using Realm
Another of Alex Feyerke’s recommendations on designing offline-first applications is “Preempting user’s needs”. This could apply to the functionalities needed by users of the app in an offline state, one of which is access to specific data.
In our application, we can store the user’s recordings locally and display it when the app is offline. To do this, we would store the local data in Realm.
Realm is a database designed to work locally within mobile with full CRUD capabilities and also support for transactions. With MongoDB Realm, data from a local Realm database can be synced to a remote Mongo database on Atlas.
For our use-case, we would be using a Synced Realm with the ability to store data locally for offline use, and also replicate the data with a remote Mongo database. We would gradually do this in the following steps outlined below;
Enable Sync Within Realm App
By default, Sync is disabled on all Realm apps. We need to enable it using the Realm UI before we can sync the data within a Realm on the device to the remote Mongo database.
To do this, visit the Realm section of the Realm UI and create a configuration similar to the one in the image below;
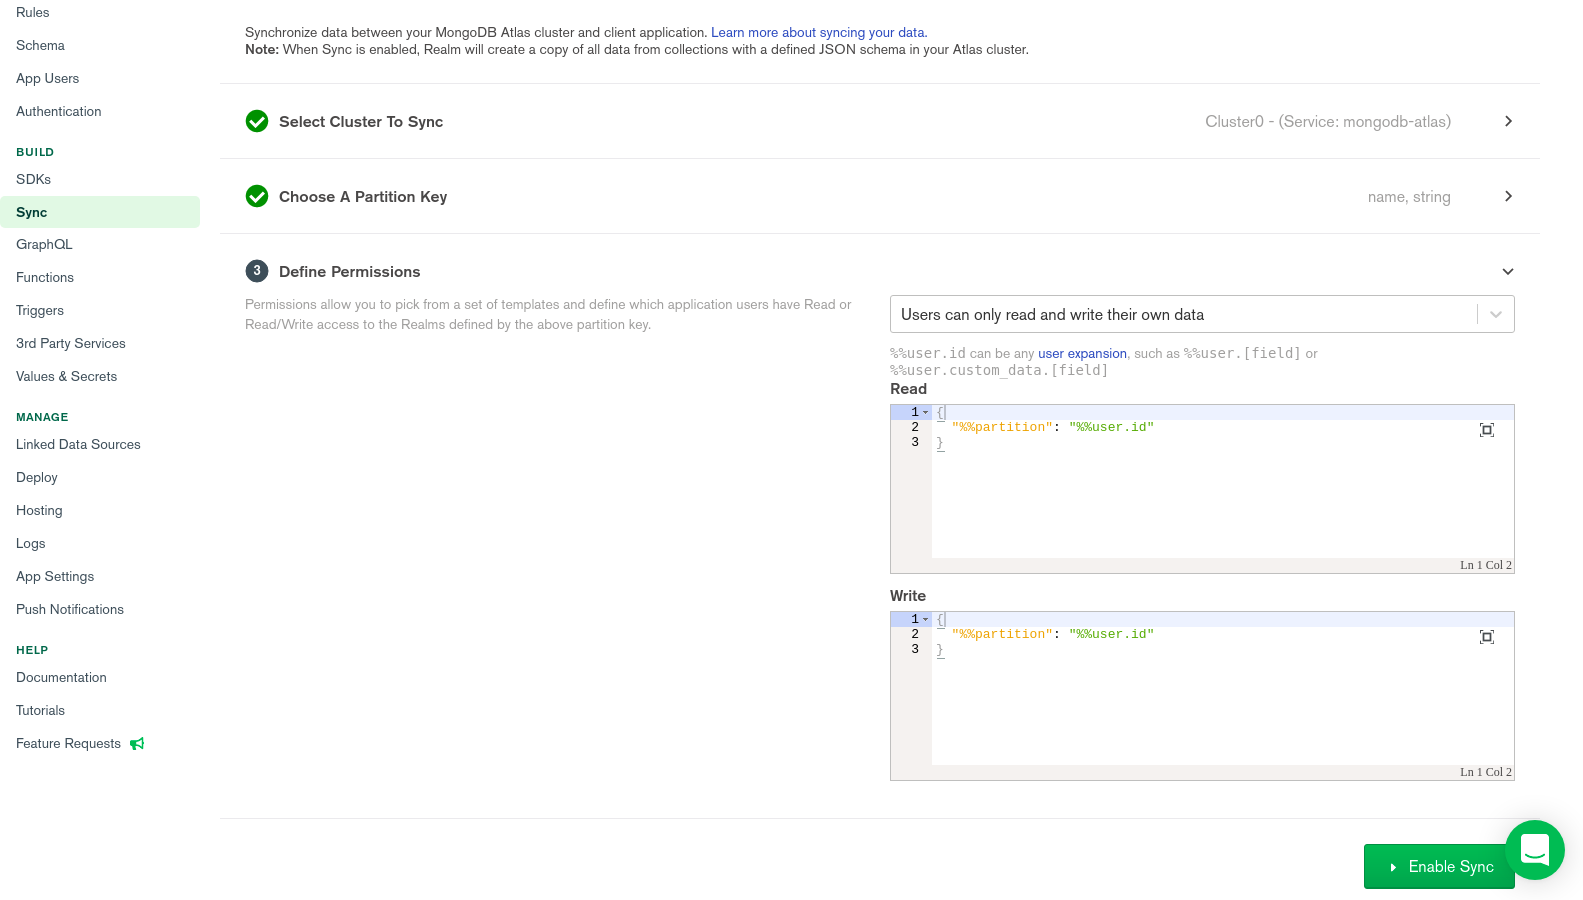
From the image above, we can see the Realm configuration having a selected cluster, a partition key, and permission configured before the sync feature can be enabled.
After enabling the sync, the next step would be to create a data model within the app which defines the structure of the data synced.
Define A Data Model With Application
Defining a model for the data getting stored locally and also replicated in the database ensures data consistency as it performs a validation on the data each time an operation is about to be performed.
For our use-case, we would create a Realm Schema model format in a new schema.js file;
The entire schema.js file above contains the schema for our local data and also its Realm configuration. Take note of the following variables;
-
RecordingSchema — This is the schema for the
RecordingRealm. Each schema must have a name field for accessing the realm object later, a properties field containing fields from the document collection which is to be saved offline, and lastly, a primaryKey (PK) specifying one of the fields within the properties object as a primary key. -
RealmConfiguration — As the name implies, this is the configuration for the Realms within the app. It must have a schema field holding an array of all created schema, and a
syncobject containing the logged-in user, and a partition value having a field name contained in the data documents. Optionally we can add aschemaVersionfield to track changes made to this schema.
Note: On every change made to a Realm’s schema, a migration function field is required within the configuration to effect the change on previous documents created in the Realm.
MongoDB Realm Sync For Offline Data Access
Previously when the app was built without offline support, data was gotten from a GraphQL query made in the Home.js file to fetch data from the MongoDB database.
With the recent changes, we would be using MongoDB Realm Sync to manage all data operations. When a new recording is created, it would be inserted into the local Realm database on the device and also replicated in our remote database.
To do this, modify the Home.js file with the code below to store data gotten from the GraphQL API into the local Realm.
In the modified useEffect hook above, we read data from the synchronized Realm and store it in the component’s local state.
Using a conditional statement within the rendered component, we check if the data has been loaded from Realm, then we display data stored in the local state using a Flatlist.
One Last Thing To Do
Our application is designed to upload recordings into an Amazon S3 bucket then return a link to the uploaded file which we store in MongoDB, but with internet connection lost, this uploading can’t be done.
Still following Alex Feyerke’s recommendations on designing offline-first applications, we want to avoid showing an error when a user tries to create a recording. We can do this by informing users from the create recording screen, that a recording cannot be done until the internet connection is restored.
To do this, modify create-recording.js file to include the new code below;
From the highlighted parts of the code snippet above, we are detecting the device connection status, then putting the boolean result in the component’s local state.
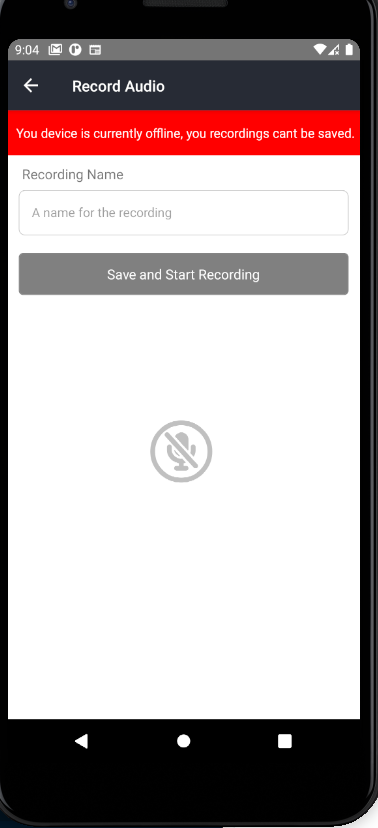
If the detected connection status is false, we disable the Create New Record button and also display a box within the screen view, explaining to the user that they cannot create a new recording until an internet connection is restored.
Below we can see an image of the screen when the device's internet is disconnected.
We can say our mobile application now has offline functionality, even though they are other functionalities we can make work with the app when offline.
Summary
Although we may seem to be always connected to the internet, application users want the ability to use their favorite app regardless of their device network connection status.
In a series within this article, we gradually used MongoDB Realm to implement offline support to an existing demo application. Here’s a quick recap of the steps we went through;
-
First, we had a quick understanding of what “Offline first” meant and how MongoDB Realm fits into the stack of an offline-first application.
-
Second, we applied Alex Feyerke’s recommendation to gracefully handle connection loss, by detecting our user’s device connection status, and displaying a flashbar notification whenever offline.
-
Next, we expanded Realm to handle offline storage in the application by modeling the offline data using a Remote Schema.
-
Lastly, we refactored the app to store created recording offline within opened Realms and retrieve the data for display from these Realms when the user’s internet connection is lost.
Here’s a link to the GitHub Repository containing the source code for the application we worked on. Feel free to clone the repository and expand the offline functionality to cover UPDATE and DELETE operations of created recordings.
If you’ve got questions, shoot me a message on Twitter and I would happy to help out!